![]() © 2016-2017 Maggie Leber <maggie@matrisync.com>
© 2016-2017 Maggie Leber <maggie@matrisync.com>
Keystone Pilot Tutorial Videos by Paul Baldwin
Start up
Choose Plane and Calibrate Controls
FM210 Systems
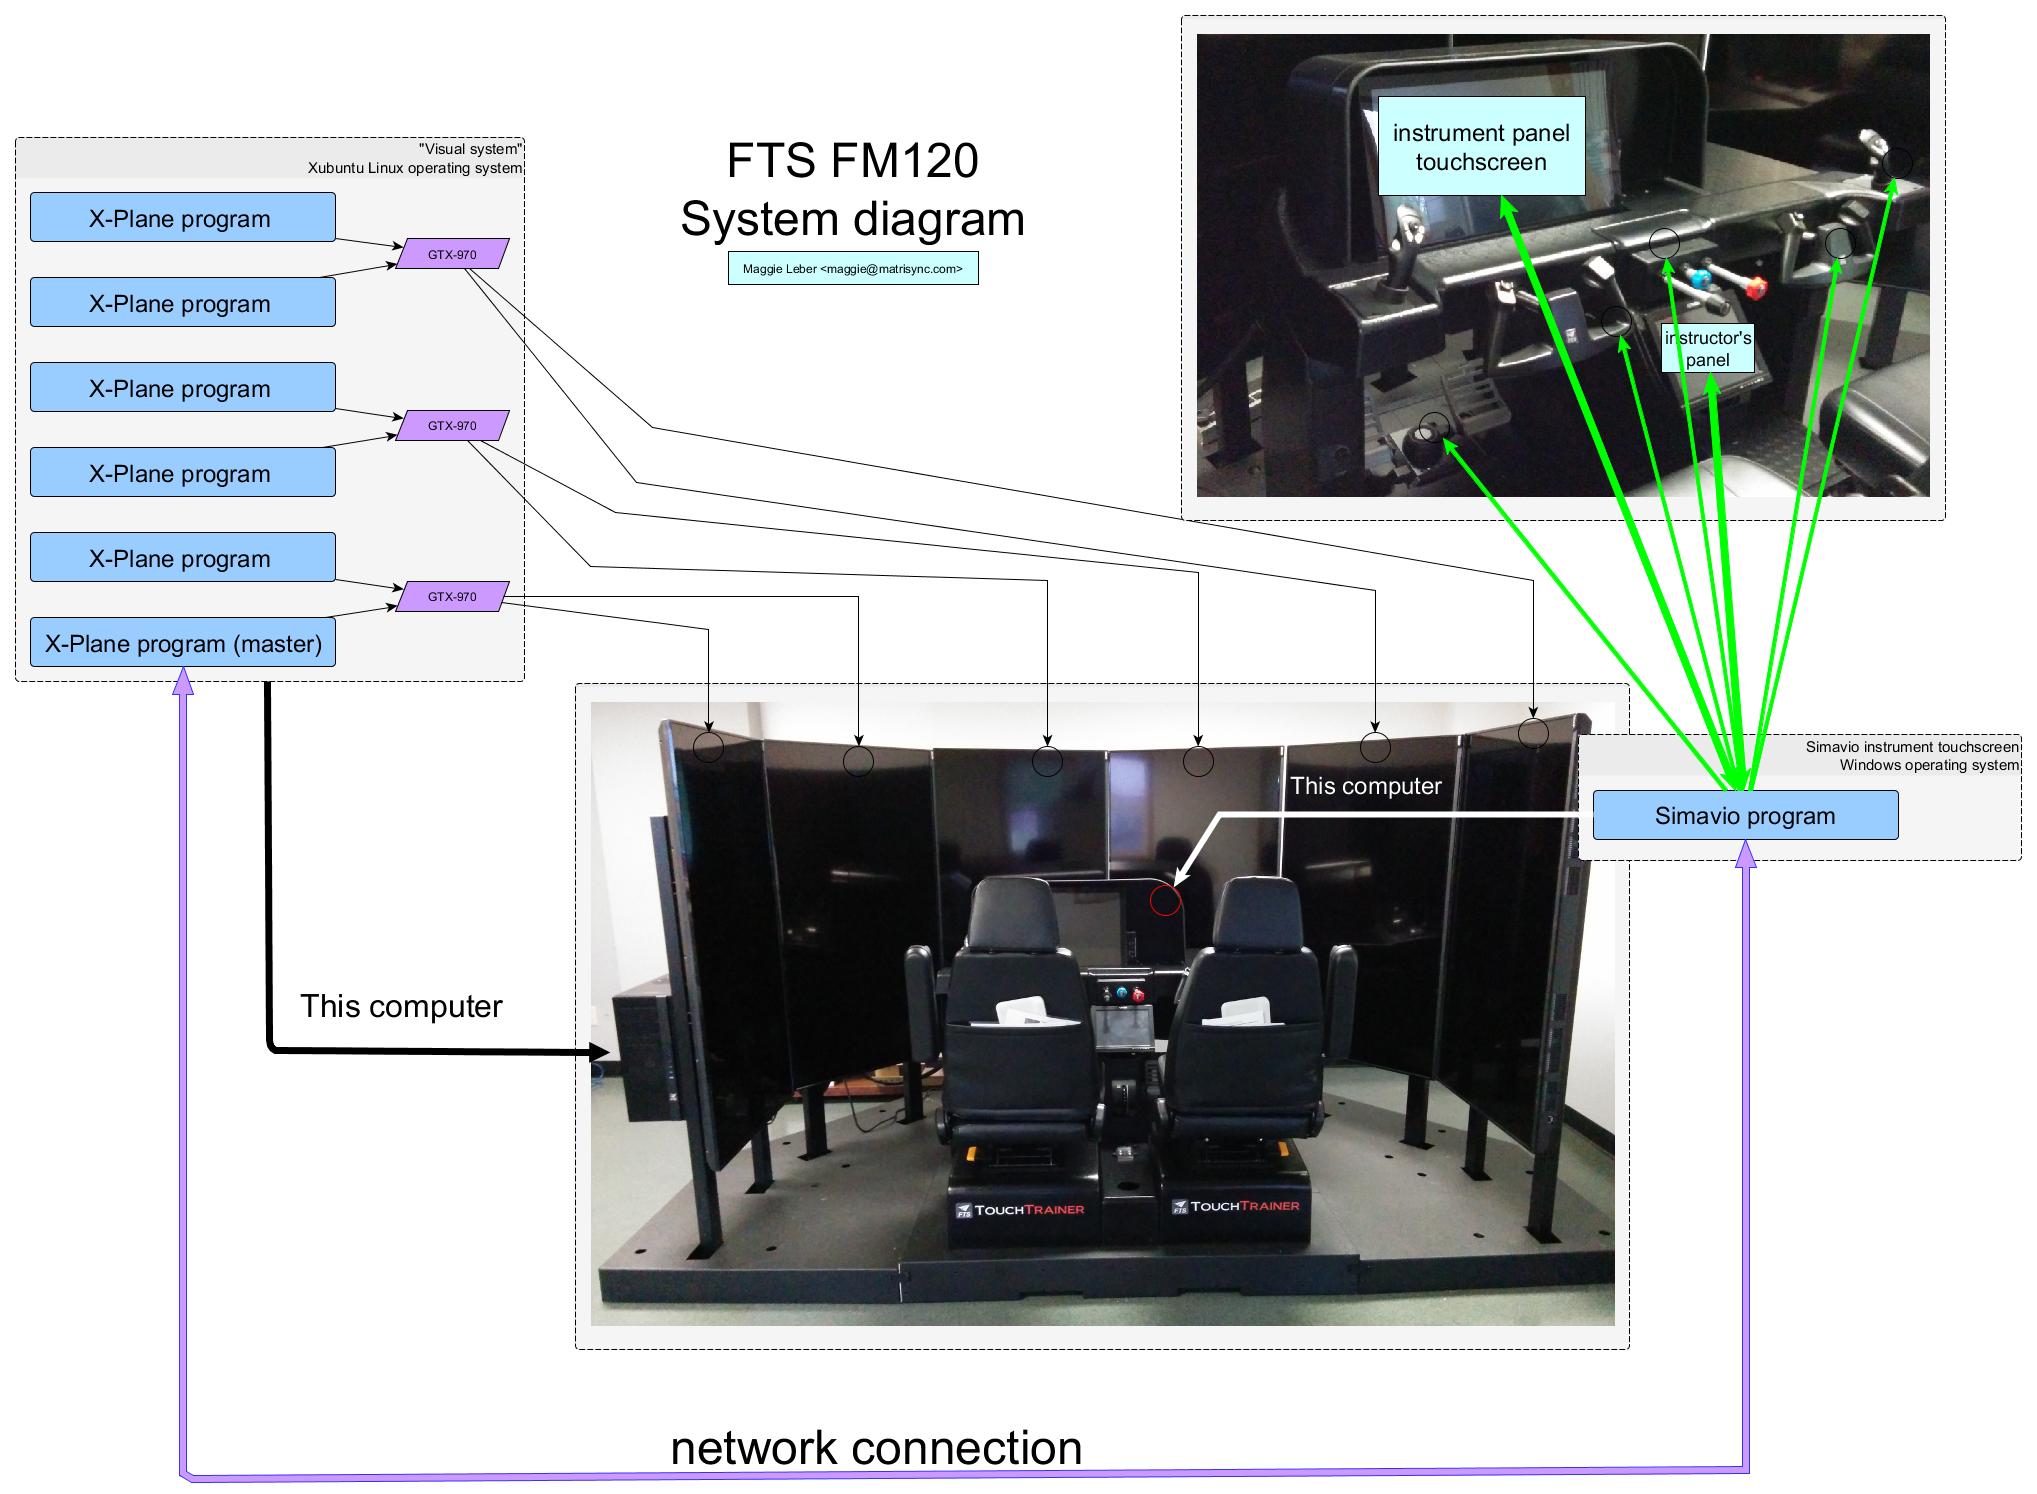
I made this diagram (with a wonderful program that I use constantly for engineering diagrams in my professional software engineering work called yEd), because to successfully use the FM120, you need to know that it contains two different programs running in two separate computers.
-
X-Plane, by Austin Meyer of Laminar Systems
X-Plane performs the simulation of the aircraft itself in terms of
-
the mathematical flight model that determines the position, attitude and movement of the aircraft itself in space and
-
the simulated operational environment, including visualization of terrain, airports, obstacles and other vehicles in the simulation, as well as time-of-day, weather, and other atmospheric conditions.
Six separate copies of X-Plane each drive one of the six big display panels that render the external view in the FM120.
-
SimAVIO, by Fly This Sim.
SimAVIO (along with the TouchTrainer hardware) provides a highly-configurable representation of the cockpit of the simulated aircraft, through control yokes and sidesticks, rudder pedals, an engine control quadrant or vernier set, and a touch-sensitive digital display screen that takes the place of the instrument panel and avionics stack. Button and knob controls on the panel are implemented through touch gestures (see Those darned knobs ("Spiral Touch")).
X-Plane (the simulation)
X-Plane Desktop Manual
The X-Plane manual is your friend.
|
☛
|
The PDF and web-based versions are substantially the same but not identical. |
-
On-line (web-based) version: http://www.x-plane.com/manuals/desktop
-
PDF version: http://www.x-plane.com/files/manuals/X-Plane_10_Desktop_manual.pdf === Getting cinematic: playing with the camera
The normal simulator display is (naturally) a view from the cockpit.
But sometimes it’s useful to see things from another point-of-view, (often outside the aircraft altogether), especially when running a replay or to check control movement during preflight.
You can see the keyboard commands for moving the simulator viewpoint here in the X-Plane manual
Maggie’s Custom Scenery Data for N47
Out-of-the-box, N47 is represented very sparsely in X-Plane with a scene consisting of asurface derrived from terrain data (scrubbed of vegetation and auto-generated buildings and roads) and a runway and taxiway based on FAA data.
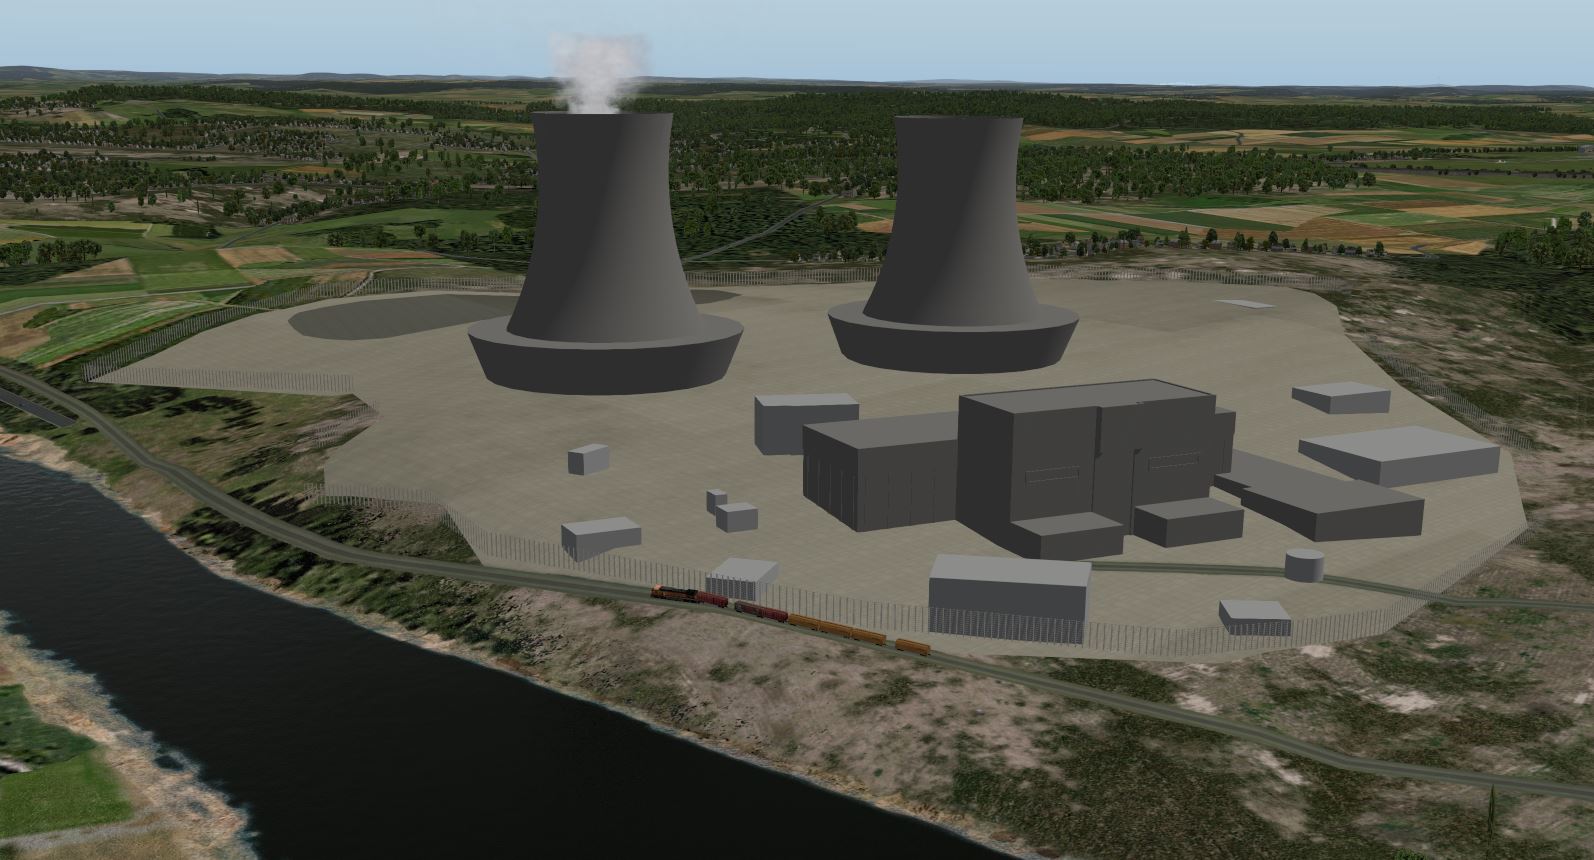
It simply doesn’t deliver a very immersive experience. Conspicuous by it’s absence is the Limerick Nuclear Generating Station, whose huge cooling towers are visible for many tens of of miles around from the ground and much further in the air.
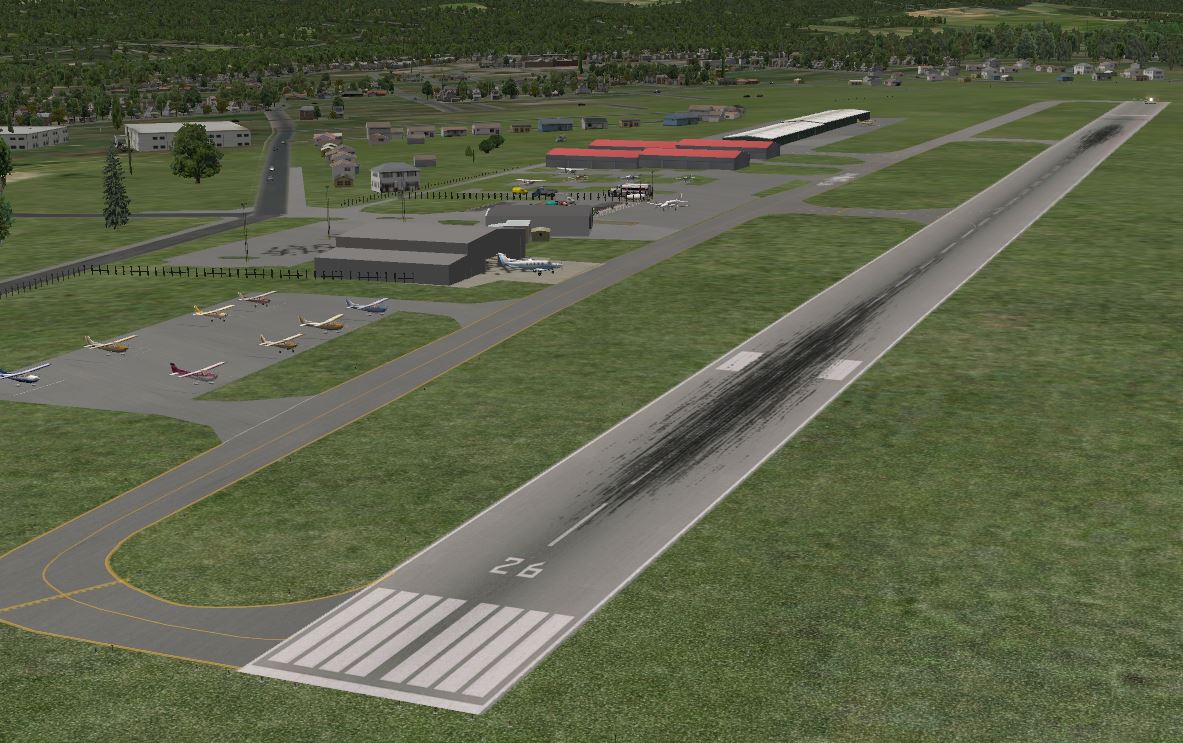
So back in 2012, I created some enhanced scenery data for the area (demonstration video here), and wehn the FM120 came to the airport it was just a natural to make it available to Paul for use in the sim. I’ve enhanced it quite a bit sinve the 2012 version and included a start on scenery for nearby KPTW as well.
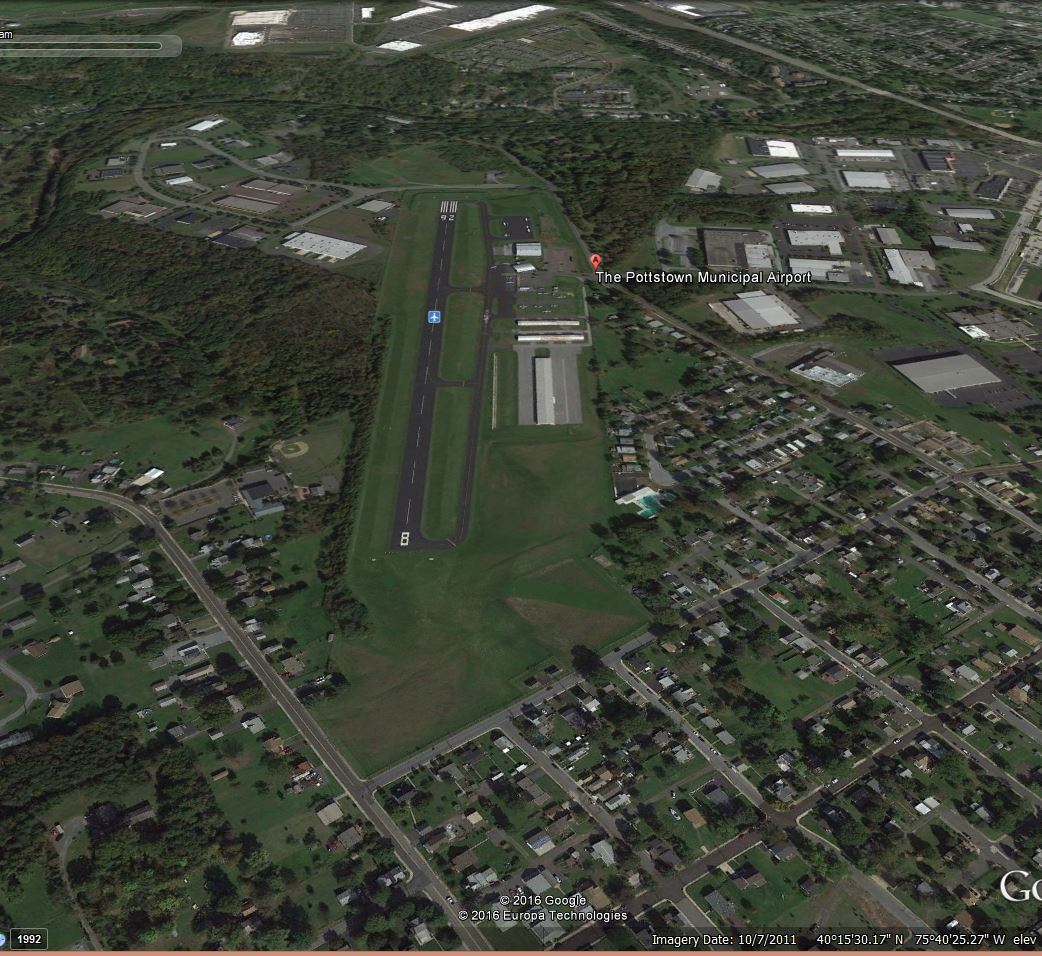
Approach to Runway 8 (Google Earth compared to simulation)
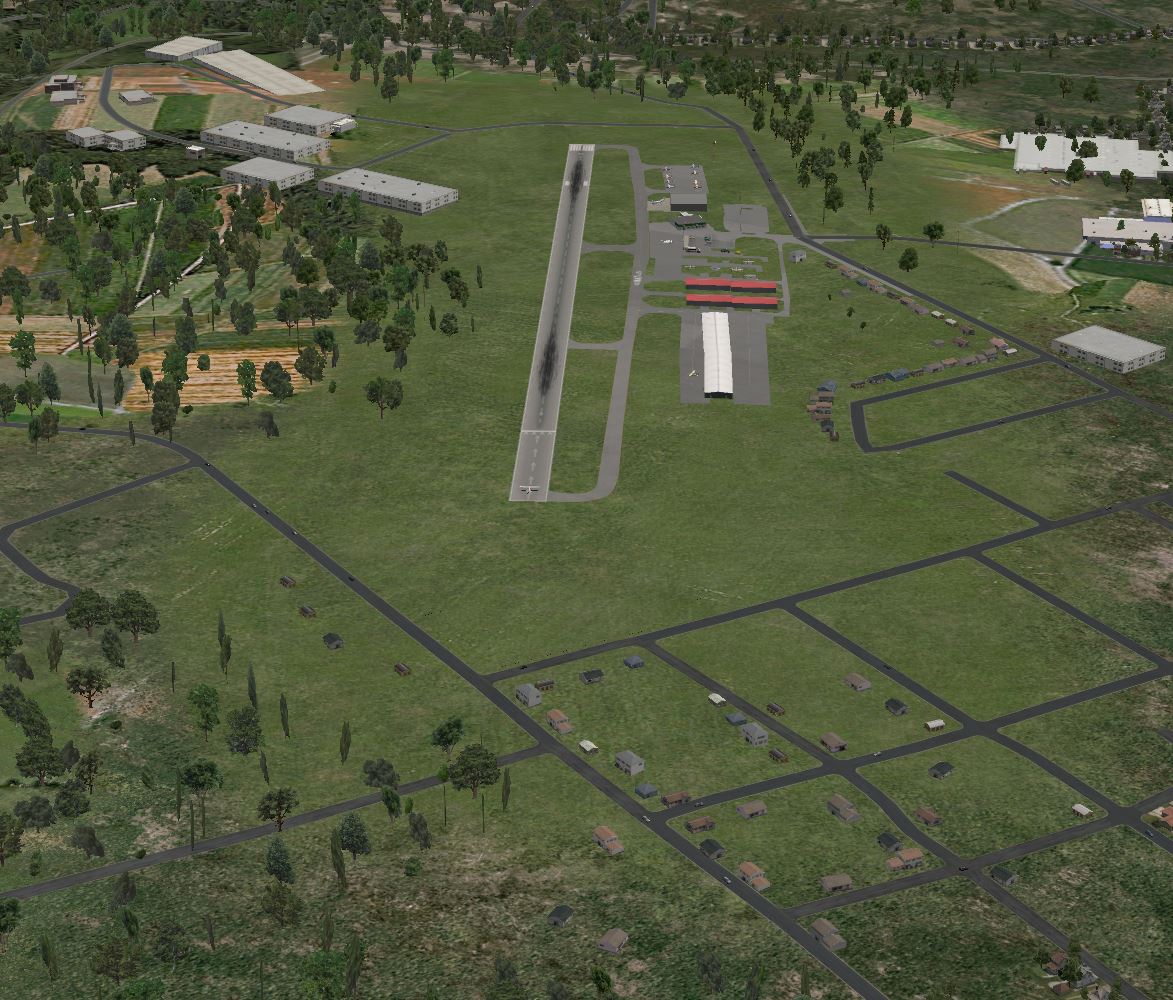
Approach to Runway 26 (Google Earth compared to simulation)
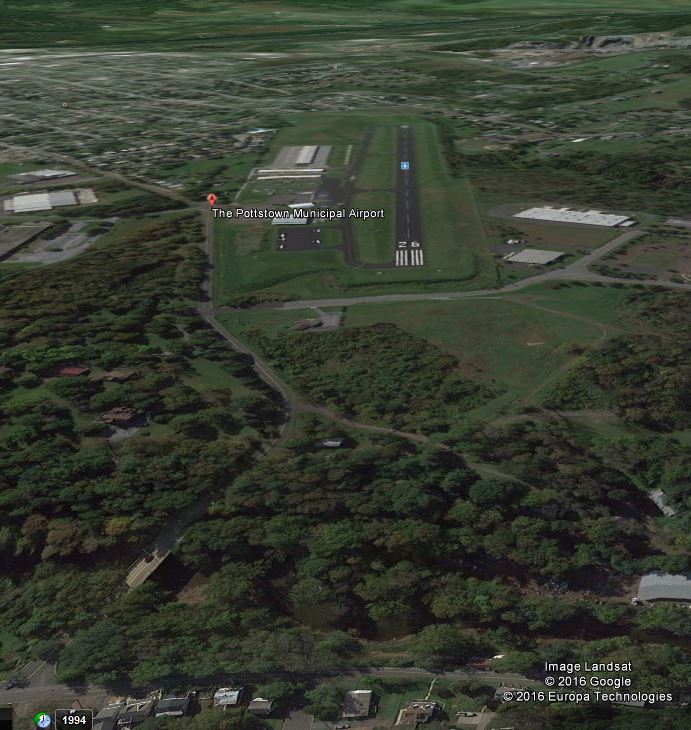
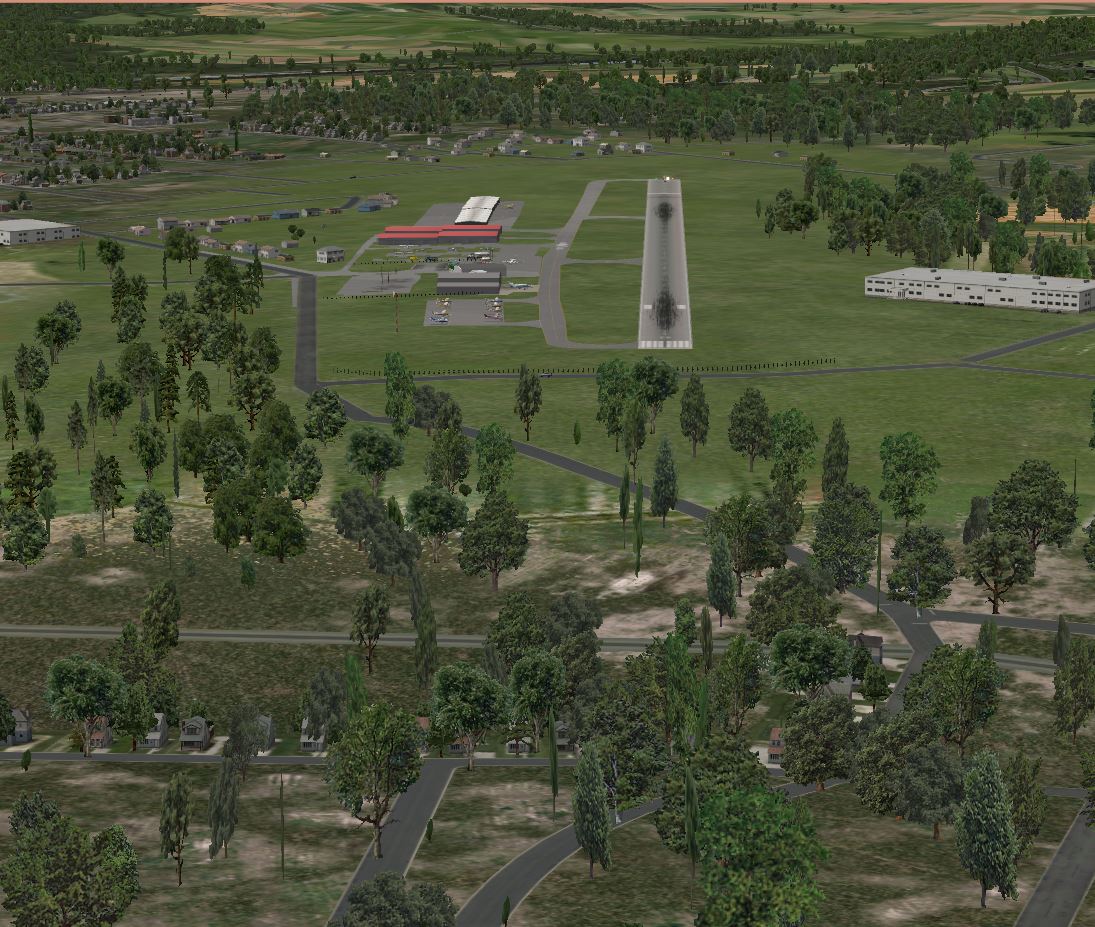
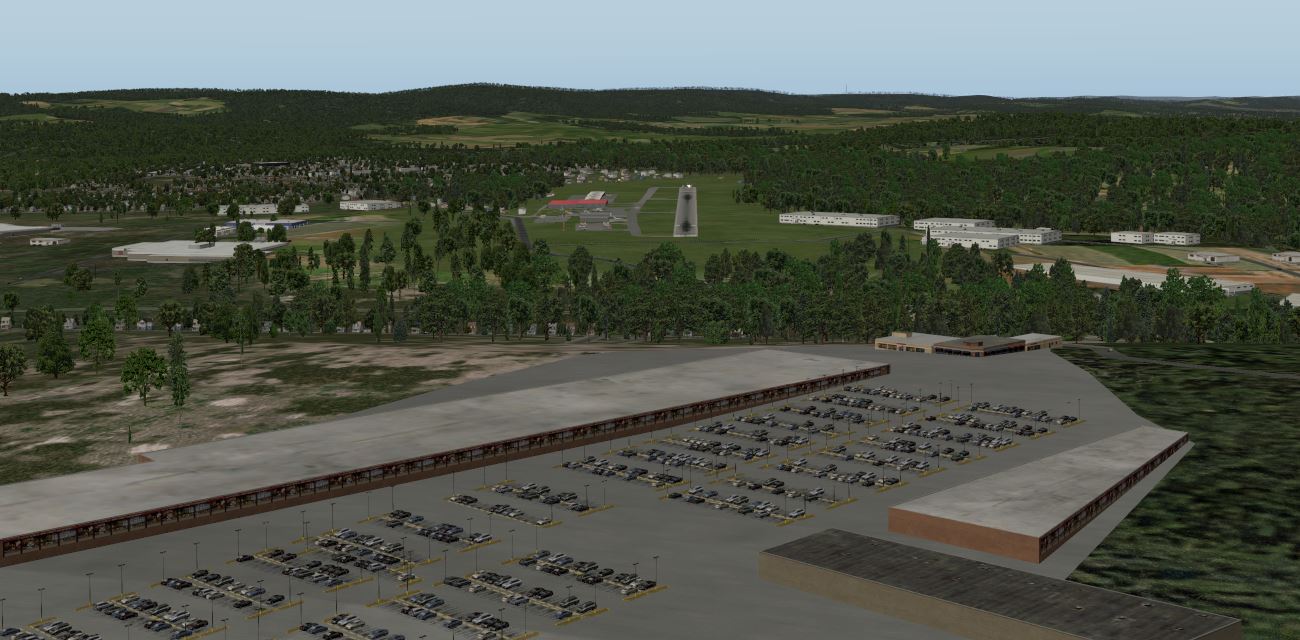
Scenes around the airport
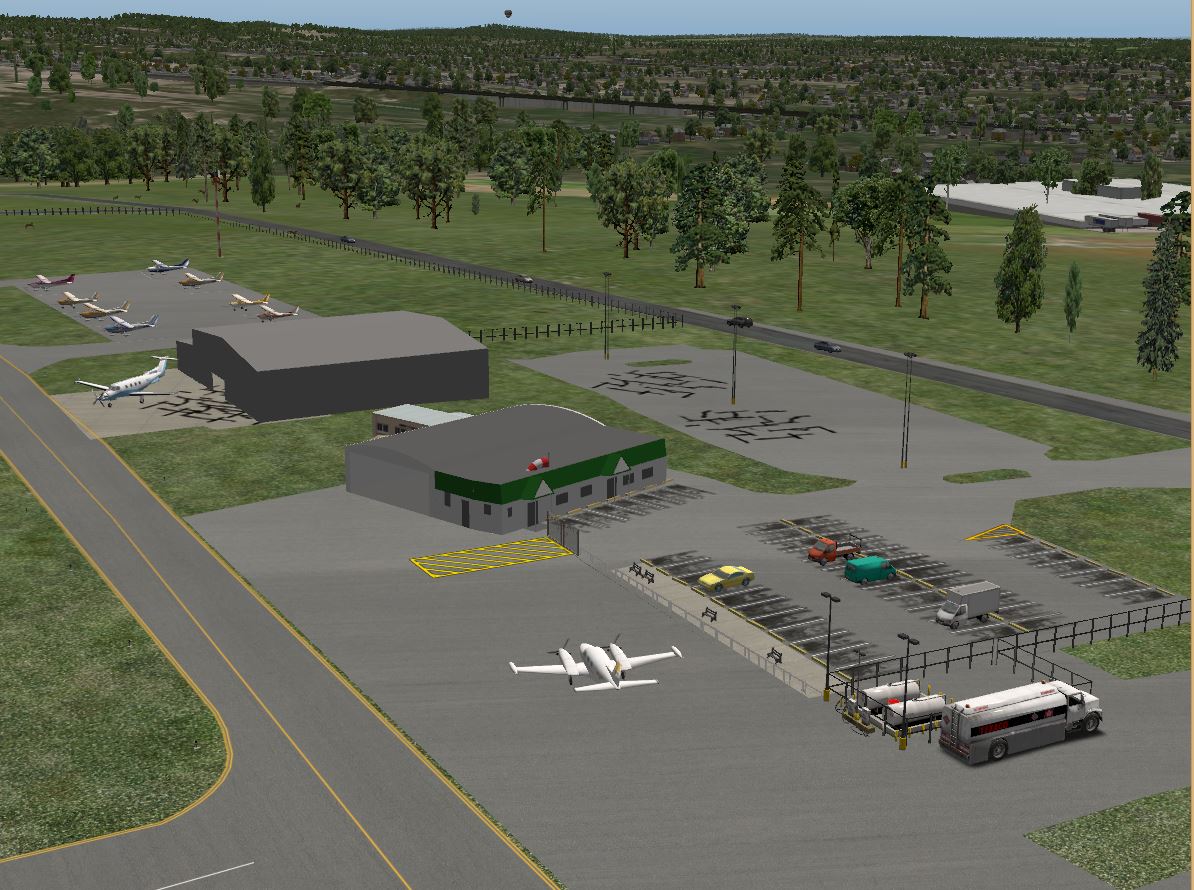
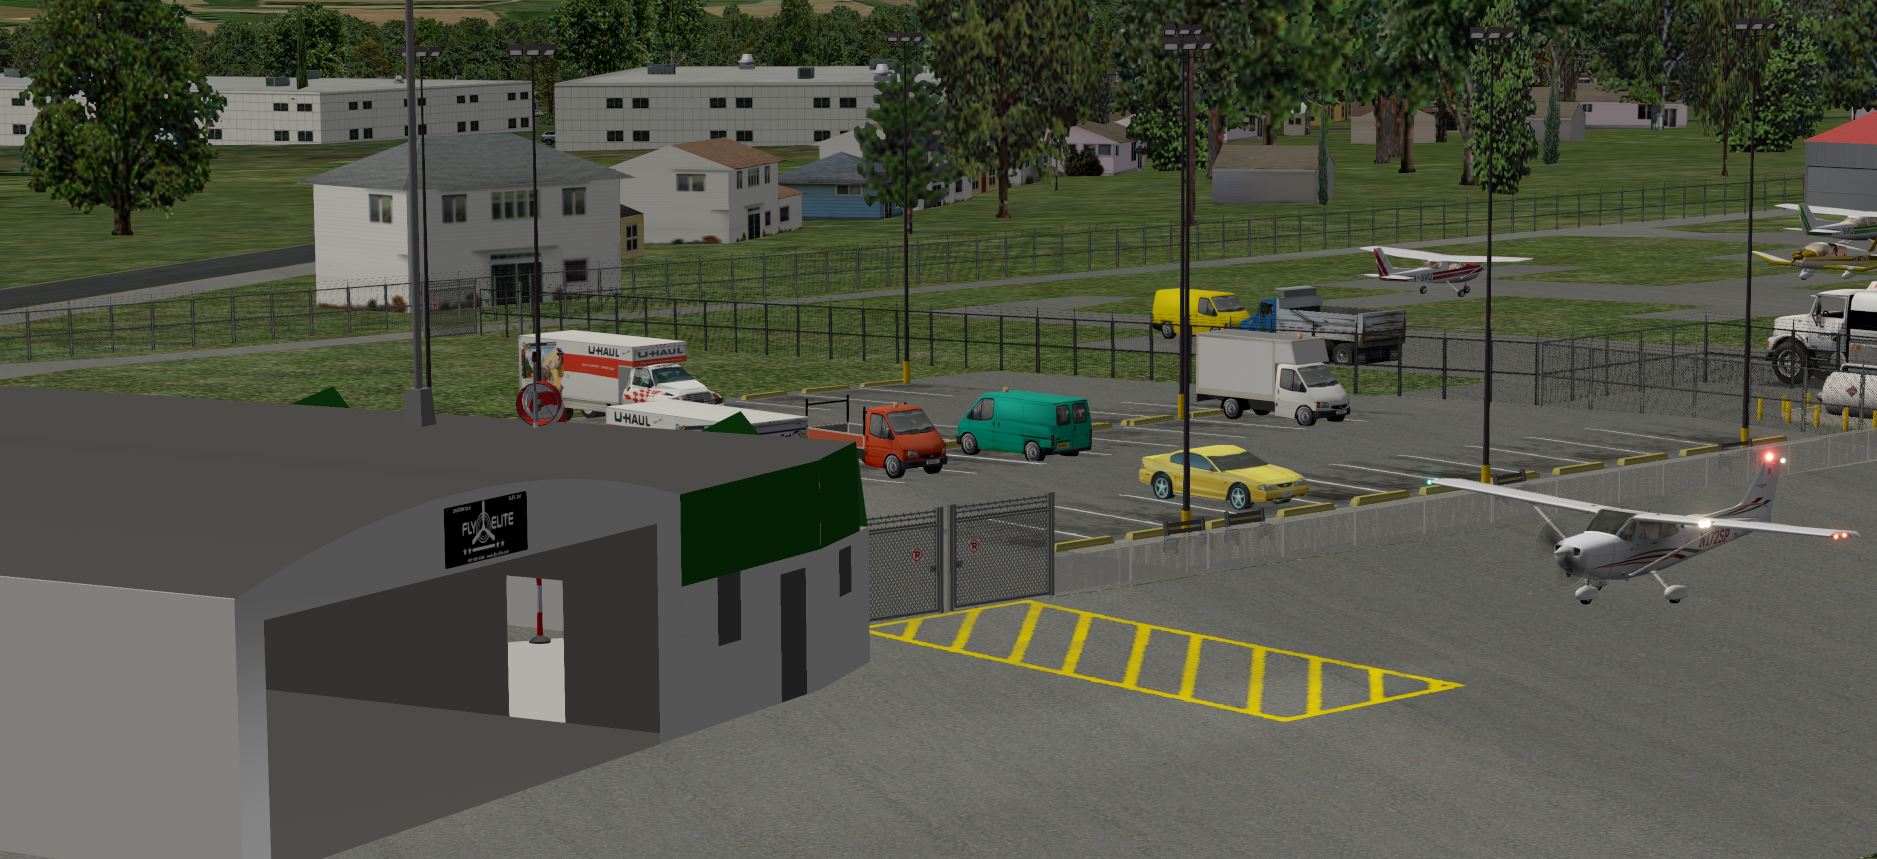
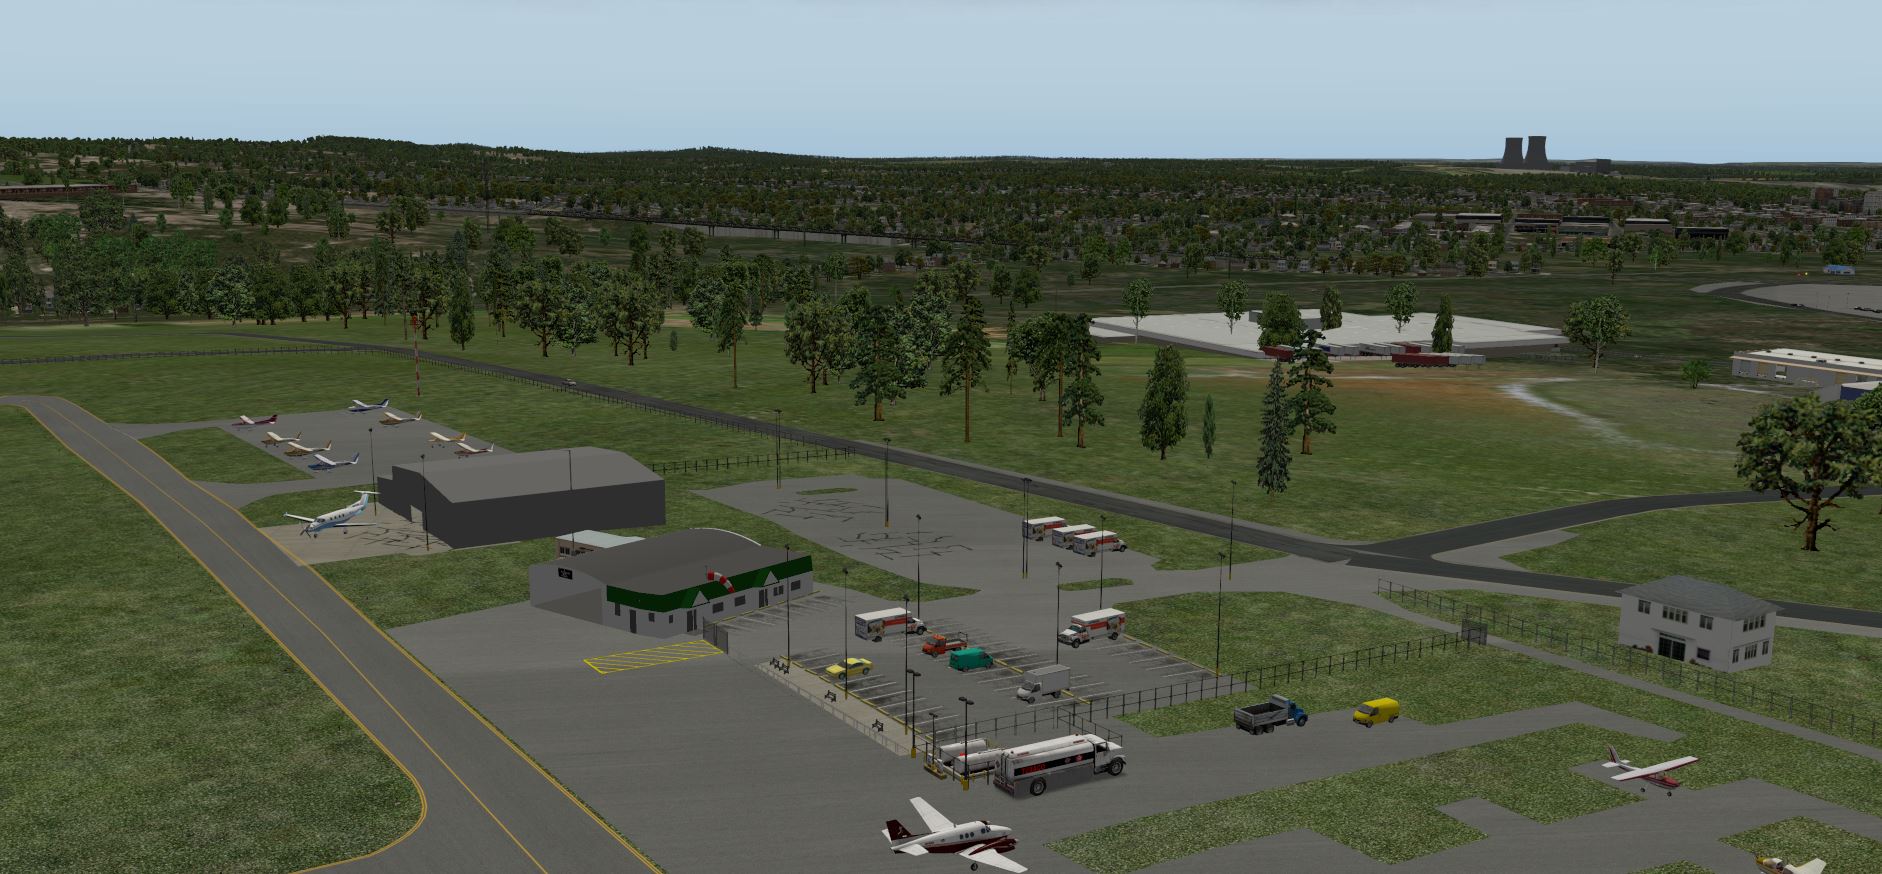
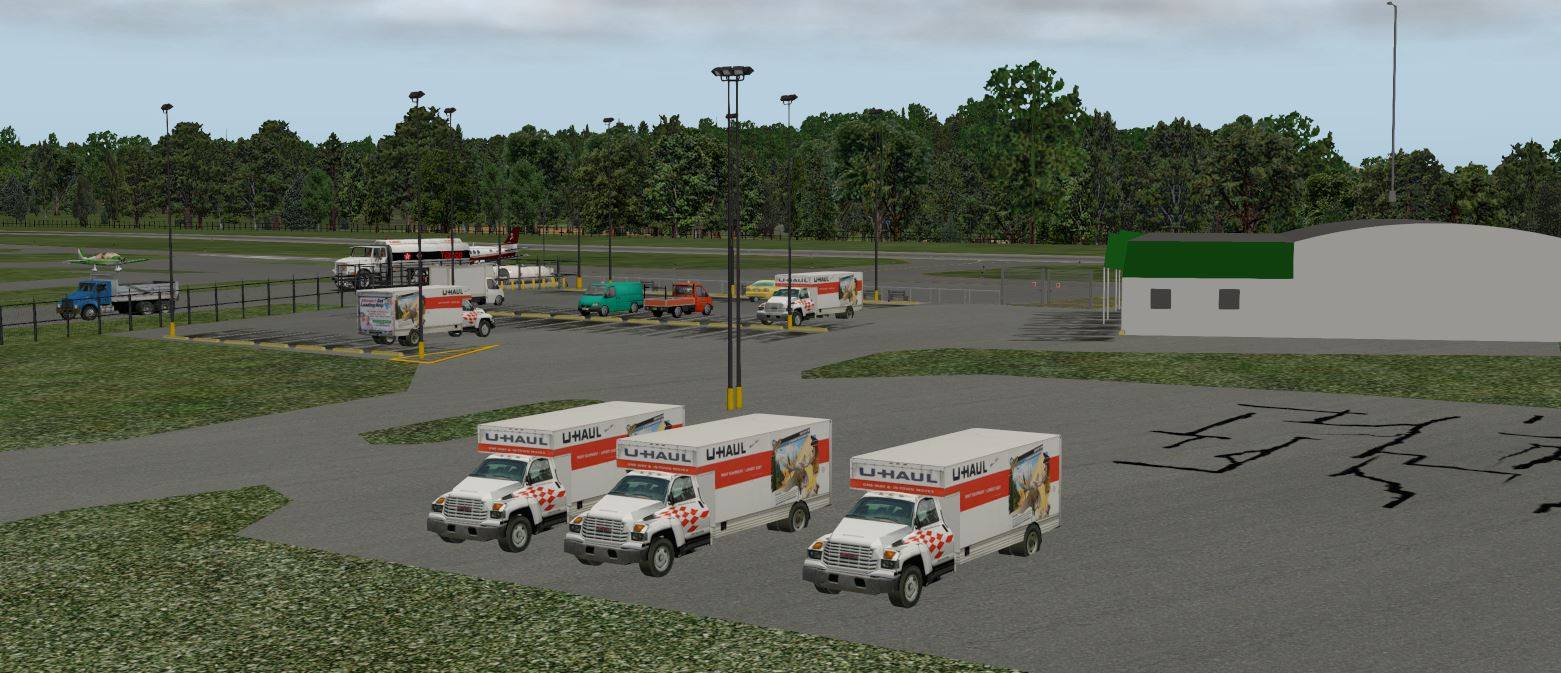
Limerick Nuclear Generating Station
SimAVIO (the instrument panel)
List of installed SimAVIO configurations
You can find the official docs here: http://www.flythissim.com/store.html
Baron analog B KFC 200 VisX.lfts
Baron analog kfc 200VisX.lfts
Baron analog STEC VisX.lfts
Baron analog_FTS530 B KFC 200 VisX.lfts
Baron analog_FTS530 kfc 200VisX.lfts
Baron analog_FTS530 STEC VisX.lfts
Baron Aspen B KFC 200 VisX.lfts
Baron Aspen kfc 200VisX.lfts
Baron Aspen STEC VisX.lfts
Baron G1000 VisX.lfts
Baron Garmin 500 KFC VisX.lfts
Baron Garmin 500 STEC B VisX.lfts
Baron Garmin 500 STEC VisX.lfts
Baron Garmin 500 VisX.lfts
Bonanza analog VisX.lfts
Bonanza analog_FTS530 VisX.lfts
Bonanza Aspen JPI930 VisX.lfts
Bonanza Aspen VisX.lfts
Bonanza G1000 VisX.lfts
Bonanza Garmin 500 A36 VisX.lfts
Bonanza Garmin 500 A36TN JPI930 VisX.lfts
Bonanza Garmin 500 F33 VisX.lfts
Bonanza Garmin 500 STEC VisX.lfts
Bonanza Garmin 500 VisX.lfts
Cessna_172SP_G500_VisX.lfts
Cessna_172SP_RG_G500_VisX.lfts
Cessna_172S_Aspen_VisX.lfts
Cessna_172_G1000_TT_VisX.lfts
Cessna_172_RG_G1000_TT_VisX.lfts
Cessna_182_G1000_kfc140_TT_VisX.lfts
Cessna_182_G1000_TT_VisX.lfts
Cessna_182_G500_VisX.lfts
Cessna_182_RG_G1000_TT_VisX.lfts
Cessna_182_RG_G500_VisX.lfts
Cessna_206_G1000_TT_VisX.lfts
Cessna_analog_172SP_FTS530_430_TT_VisX.lfts
Cessna_analog_172SP_RG_FTS530_430_TT_VisX.lfts
Cessna_analog_172SP_RG_TT_dual_Bendix_VisX.lfts
Cessna_analog_172SP_RG_TT_VisX.lfts
Cessna_analog_172_SP_VisX.lfts
Cessna_analog_182RG_FTS530_430_TT_VisX.lfts
Cessna_analog_182RG_TT_dual_Bendix_DME_VisX.lfts
Cessna_analog_182RG_TT_dual_Bendix_VisX.lfts
Cessna_analog_182_dual_430_TT_VisX.lfts
Cessna_analog_182_FTS530_430_TT_VisX.lfts
Cessna_analog_182_TT_dual_Bendix_DME_ADF_VisX.lfts
Cessna_analog_182_TT_VisX.lfts
Cessna_analog_T182_RG_TT_VisX.lfts
Cessna_analog_T182_TT_VisX.lfts
Cessna_T182_G1000_TT_VisX.lfts
Cessna_T182_RG_G500_VisX.lfts
Cessna_T206_G1000_TT_VisX.lfts
Diamond_DA20_GNS430_Mirror_VisX.lfts
Diamond_DA20_GNS430_STEC_VisX.lfts
Diamond_DA20_GNS430_VisX.lfts
Diamond_DA40_FTS530_KAP140_VisX.lfts
Diamond_DA40_FTS530_VisX.lfts
Diamond_DA40_G1000_kap140_VisX.lfts
Diamond_DA40_G1000_VisX.lfts
Diamond_DA42_G1000_kap140_VisX.lfts
Diamond_DA42_G1000_VisX.lfts
Piper_Archer_Analog_VisX.lfts
Piper_Arrow_FTS530_VisX.lfts
Piper_Cherokee_G500_IIIB_VisX.lfts
Piper_Cherokee_G500_STEC55X_VisX.lfts
Piper_Malibu_FTS530_VisX.lfts
Piper_Meridian_G1000_VisX.lfts
Piper_Saratoga_Avidyne_VisX.lfts
Piper_Saratoga_FTS530_MovingMap_VisX.lfts
Piper_Saratoga_FTS530_VisX.lfts
Piper_Saratoga_G1000_VisX.lfts
Piper_Seneca_55x_Aspen.lfts
Piper_Seneca_II_Aspen.lfts
Piper_Seneca_II_FTS530_VisX.lfts
Piper_Warrior_FTS530_HSI_VisX.lfts
Piper_Warrior_FTS530_VisX.lfts
SR_20_G1_Analog_TT_VisX.lfts
SR_20_G1_Aspen_TT_VisX.lfts
SR_20_G2_DAU_Avidyne_TT_DFC90_VisX.lfts
SR_20_G2_DAU_Avidyne_TT_VisX.lfts
SR_20_G2_SIU_Avidyne_TT_VisX.lfts
SR_20_G3_Perspective_TT_VisX.lfts
SR_20_G5_Perspective_TT_VisX.lfts
SR_22TN_G2_Avidyne_TT_VisX.lfts
SR_22TN_G2_DAU_Avidyne_TT_DFC90_VisX.lfts
SR_22TN_G2_DAU_Avidyne_TT_DME_DFC90_VisX.lfts
SR_22TN_G2_DAU_Avidyne_TT_DME_VisX.lfts
SR_22TN_G2_DAU_Avidyne_TT_VisX.lfts
SR_22TN_G3_Perspective_TT_VisX.lfts
SR_22_G1_Analog_TT_VisX.lfts
SR_22_G2_Aspen_TT_VisX.lfts
SR_22_G2_DAU_Avidyne_TT_DFC90_VisX.lfts
SR_22_G2_DAU_Avidyne_TT_VisX.lfts
SR_22_G2_SIU_Avidyne_TT_VisX.lfts
SR_22_G3_Perspective_TT_VisX.lfts
SR_22_G3_Turbo_Perspective_TT_VisX.lfts
SR_22_G5_Perspective_TT_VisX.lfts
SR_22_G5_Turbo_Perspective_TT_VisX.lfts
Those darned knobs ("Spiral Touch")
|
❗
|
Working "virtual knobs" in SimAVIO is called "Spiral Touch". Watch this video from FTS! to see how it is supposed to work. |
Speaking of "how to correctly twist knobs", I made this little ditty to explain how the FTS-430 (GNS-430 work-alike) GPS controls seem to work in SimAVIO:
Pushing buttons on a touchscreen is easy. Turning knobs is a bit different…you have to touch the knob to activate it and drag out while a white line confirms you have the knob selected, then move in a circular motion around the knob to simulate turning it clockwise or counterclockwise. The white line follows your finger while you hear a clicking sound. The further out you move your finger from the center of the button, the more precise your control. And the movement is scaled: one full turn of the virtual knob is often several trips of your finger around the knob on the touchscreen.
So much for muscle memory…
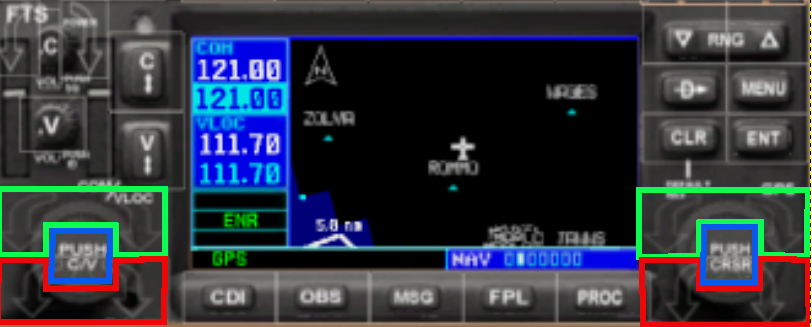
But the GNS-430 knobs are a special challenge…they have concentric inner and outer knobs and can also be pushed.
As far as I can determine, this is how that works:Touching the green areas in the screenshot above selects the outer (big) knob. Touching the red areas selects the inner (small) knob. And touching the blue areas simulates pushing the knob in. Missing the red or green areas and hitting the blue means you have to touch the blue again, because the knob-push is a toggle action button; swapping between com and nav on the left-had radio side, and entering and leaving cursor mode on the right-hand GPS side.
(The SimAVIO preferences menu has a checkbox for "Disable Spiral Touch". It doesn’t work and they don’t intend to fix it.)
Interestingly enough, this used to be worse.
Spiral Touch rev2
Initial implementation of a new knob actuator. This improved actuator will combine two touch areas (clockwise and counter-clockwise) into a single touch area. The user will use a spiral movement to increment or decrement the knob. With the old style knob, users could only adjust in one direction. If the other direction was needed, the user was required to depress from the screen and press the opposite rotating touch area. In short, we are expanding the Spiral Touch that was only used on heading and course knobs previously, to a broader group of knobs such as altitude, barometric setting, map range, flight plan, frequency and brightness. “Initial” means that only some of the knobs are converted for this release. A final implantation will be included in the next release of SimAVIO.
And then…
Spiral Touch rev3
This is the final rollout of the new knob actuators. Many of the knobs from the previous release were still on the old style where counterclockwise and clockwise were separate buttons. The dual concentric GPS FMS knob and the dual concentric frequency tuning knobs are merged and simplified. Users can now twirl their finger in either direction to increment or decrement the alpha numeric entry of waypoints or frequencies.
Improved touchscreen response: The actuation of buttons and switches has changed from touch DOWN to touch OFF. This virtually eliminates inadvertent actuation and brings FTS touch screen actuation into line with other applications…
Multiple USB HID devices with identical product / serial numbers can now be identified as separate hardware devices in SimAVIO. 4 identical Leo Bodnar Button Box Interfaces were tested, however more may be possible.
The release notes also mention this device:
…suggesting it may be possible to build hardware knobs that will work with SimAVIO.
A new gotcha: SimAVIO computer hang
Just before a recent sim night, Paul ran into a problem where the SimAVIO computer seemed to be completely inoperable. Power was up but nothing was being displayed on either touchscreen.
While Paul was on the phone with FTS support negotiating shipping out a replacement, I took advantage of the opportunity to stick my nose under the covers of the visor, which he had removed. I saw for the first time the very spiffy casework of the SimAVIO computer; fit for an uber-pro "gamer", and mused that that beautiful hardware spent all its time hidden from view.
It just seemed to me odd that such high-end gear should pack it in for no obvious reason, and I thought a hardware reset might be in order "just for grins".
The reset button seemed to be recessed, and I couldn’t get my finger on it. My tools were out in the car, so I scrounged around for something small and pointy enough to slip in there and came up with the Allen wrench used to adjust the rudder pedals.
Poking at the reset button with that made it clear that the button had gotten stuck down under the edge of the casework and was constantly forcing PWR OK low, keeping the machine from running; it popped up and the small touchscreen showed its power-on display.
One cycle of the main SimAVIO power switch and all was once again well, and sim night could continue. So that’s something to check if the SimAVIO compy seems to be hors de combat.
Temperature Sensors
Recently we’ve had a problem with the simulator simply going black two-screens-at-a-time after prolonged (>1 hr) use.
The suspicion being that possibly we have a cooling problem in the Linux(X-Plane) computer. To help diagnose this,
I’ve installed and configured [temperature monitoring software called psensors](http://wpitchoune.net/psensor/). You can find
it on the rabbit menu in the upper left corner of screen 1-Left. Click on the upper-right corner of the psensors window
and select "always on top" so the window will float over the simulator screen while running.
Displaying the flight control inputs
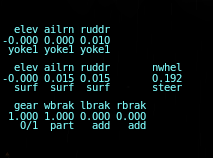
When troubleshooting issues with the control yoke or rudder pedals, it’s often useful to be able to see what forces X-Plane
is seeing on the controls and the resulting effect on the simulated control surfaces. To do this, go to the settings/Data Input
and Output menu on the 1-Left screen, and check these boxes…
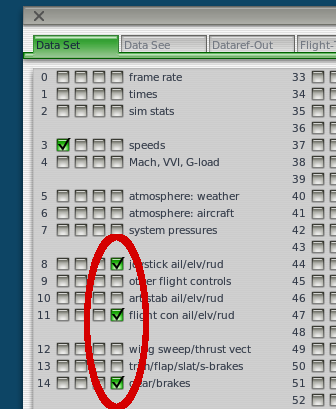
it will result in a display in the upper-left corner on that screen:
Stylus pens
A stylus pen is a substitute for using your finger to touch a capacitive touch screen. When they work well, the detected touch is more precise and more reliable.
Here’s a nice inexpensive brand I have used (inexpensive is good because you will lose them)
CloudAhoy
CloudAhoy is a web-based service for debriefing flying missions. It accepts GPS track data (and airborne video), and renders 2D and 3D map views, simulated cockpit view (with or without a HUD) and detailed analysis of your flying.
I’d been working at a way to get X-Plane to output a CloudAhoy-compatible GPS track, but it turns out I was trying too hard. Just install the CloudAhoy mobile app on your iPad or other mobile device (There’s an Android version but you’ll need to install the X-Plane to GPS app because the CloudAhoy Android app apparently doesn’t have X-Plane compatibility built in).
It works quite well. Location data is good. There seem to be some issues with altitude and airspeed; I’m investigating that.
Now an instructor can debrief my home simulator work in between lessons in the real airplane and the FM210.
Oh, noes…I have invented aviation homework.
Q and A with Gene Poppel CFII
On Mon, Aug 1, 2016 at 7:01 PM, Eugene Poppel <genepoppel@comcast.net> wrote:

Maggie,

I’ve had a couple of sessions with Paul exploring the setup and some of the things it can do.  Naturally, I make comparisons with the Redbird, since I did get to use it a lot.  Since at this point, you are probably more knowledgeable than anyone, can you discuss a couple of questions about capabilities?
Sure, will do my best. I have pretty good knowledge of X-Plane, the underlying simulation package. It has very detailed and precise simulations of many, many different kinds of aircraft.
What I know about SimAVIO, which is the Windows program that drives the touchscreen and instructor’s console is much more broad-brush. It’s a product of FTS, the company that sells the whole package, and the documentation for that strikes me as kind of spotty.
In general, X-Plane has very rich functionality. SimAVIO gives you contol over a rather limited subset of that, although in a lot of cases you can bypass SimAVIO and speak directly to X-Plane to get what you want.
Positioning the aircraft
    1.      A very useful feature on the Redbird was the ability to reposition the “plane” in several different ways, including

    a.      On an airport at a runway threshold, with selection of which runway.

    b.      At a point in space, flying in a direction and at an altitude that could be specified, relative to

    i.      An airport

    ii.     A navaid—direction and distance

    iii.    A random point in space selected on the laptop

This capability was extremely useful for instrument training, since you could repeat a procedure without the need to “fly” back to the initial fix, and also made it easy to do approaches anywhere in the country (world? Perhaps?).
Yah, I hear you there…and that’s one reason I’m enthusiastic about using the sim in instrument training as a student.
So… with X-Plane you can put the airplane pretty much anywhere, in any attitude, and with any state vector. You can save the current "situation" to a disk file which includes your position, altitude, attitude and velocity, the aircraft and the state of its systems, but not the weather at the time you saved. SimAVIO has a menu that appears to deal with X-Plane’s "situations" but I don’t know all the details of that not having played with it; I do know that most of the situations currently saved are at the default runway locations for individual airports. There’s one situation file on the disk that’s set up 5 north of Modena VOR at something like 10,000 ft in a C-182, so I’m guessing that one is Paul’s.
The X-Plane screen for "start-anywhere" is kind of involved:
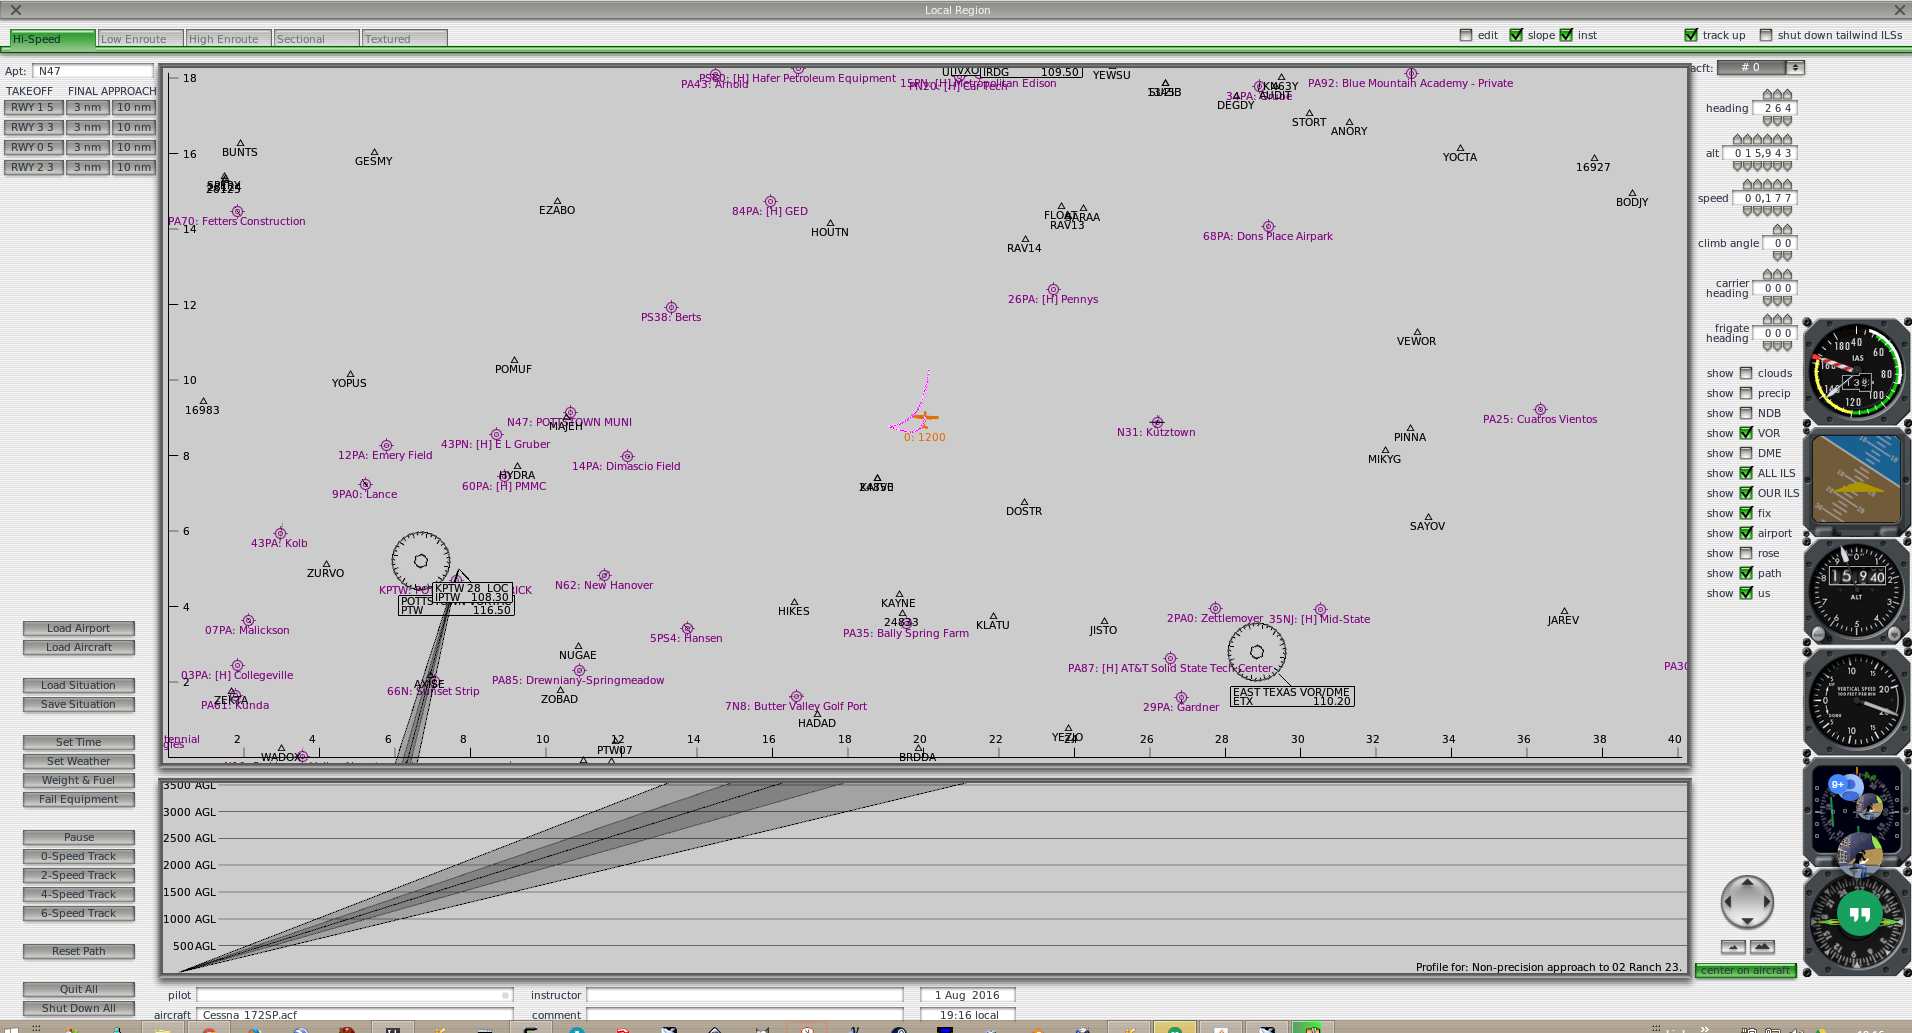
but there’s a simpler "Select Airport" one that does start you on the ground or on three or ten mile finals to that airport’s runways:
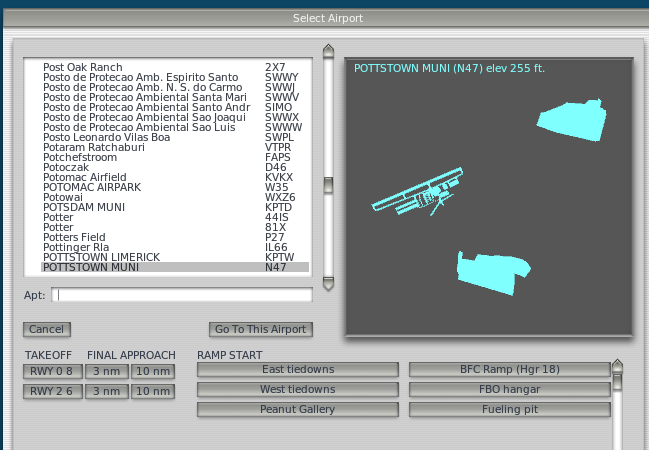
I don’t see any random capability… oh, wait. There’s a "Get Me Lost" item on the X-Plane location menu. I’ve never used it before.
I just popped it at altitude in the N47 neighborhood and it deposited me someplace near Millville and then when I tried it again, about 15 SSE of Cape May County. So I guess that counts. Don’t know if it’s on the instructor’s console or not, but you can pick it from the X-Plane menu..
Simulating equipment failures
2. Can you do realistic failures of instruments, vacuum system, alternator, etc.? For example, in the Redbird, when you failed the vacuum pump, it took several seconds for the suction to reduce to zero. This is obviously a more realistic way to get into partial panel than just covering an instrument.
The failures menu looks pretty elaborate. Here’s some of it:
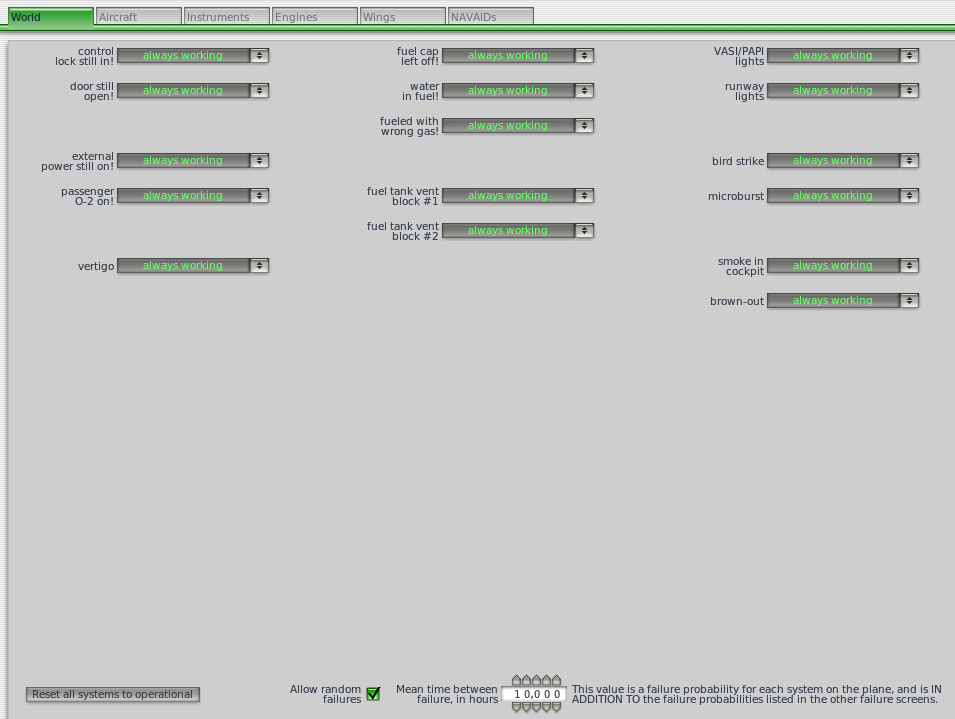
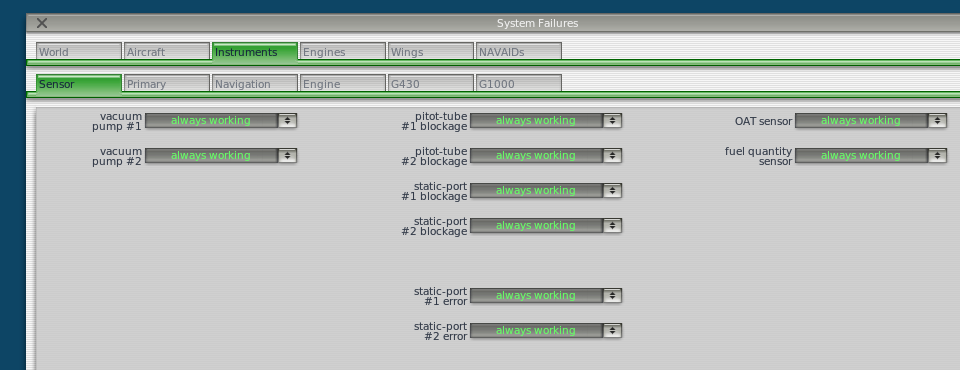
So…I just manually failed both (both!) vacuum pumps, and went back to the sim; the X-Plane AI dropped a flag right away (bit of a give-away) and gradually spun down, after a couple of minutes on partial panel it looked like:
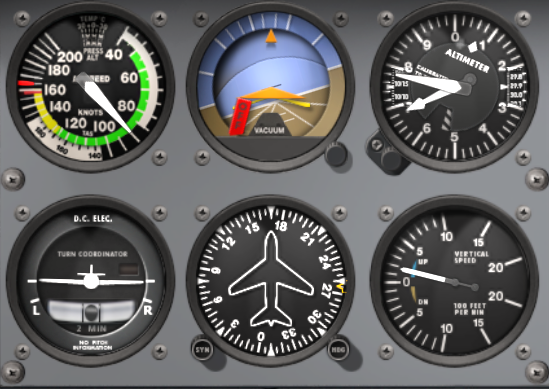
…so I’d have to rate that as pretty good realism-wise.
How it looks on SimAVIO I don’t know, but there’s lots of data available in the X-Plane network interface:
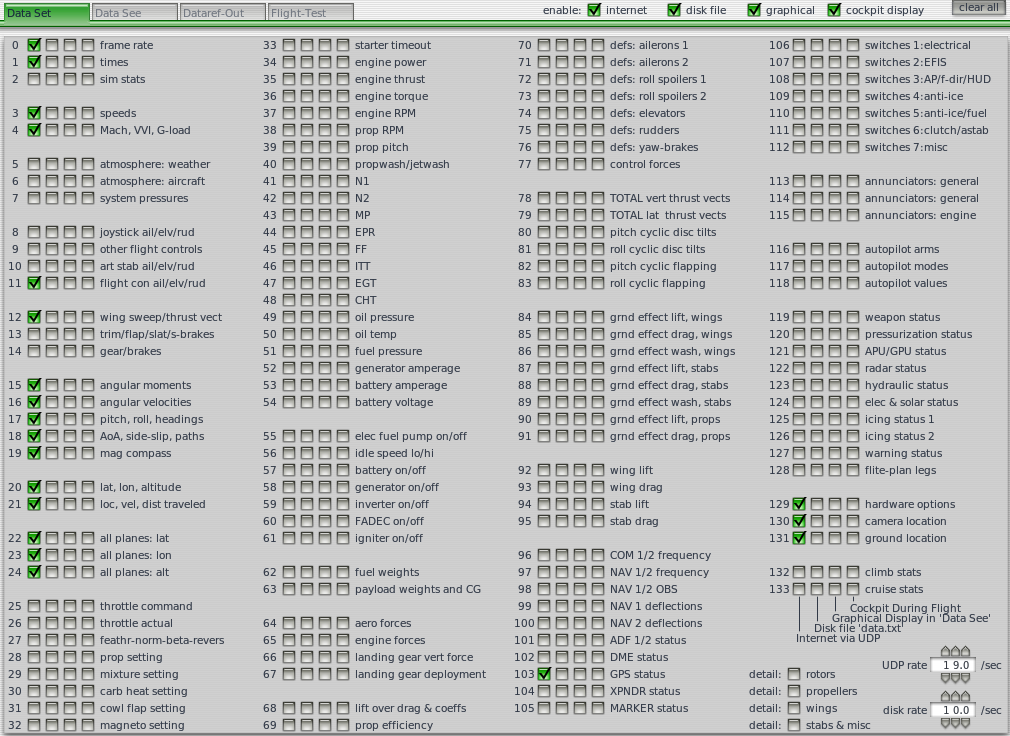
Simulating weather (clouds, visibility, winds)
3. Can you make a realistic atmosphere that simulates what you might really see when descending out of a cloud layer into low visibility?
The visuals seem quite realistic to me, both in terms of the structure of clouds and the effects of low visibility and/or precip. I flew the GPS26 into N47 the other evening under a simulated 1,000' ceiling and it convinced me…
4. Can you set different cloud conditions—coverage, cloud types, turbulence, t-storms?
The weather settings are quite detailed in X-Plane:

…and the SimAVIO menus seemed to be a decent coverage over those functions, if not 100%.
5. It appears that the airplane library doesn’t include models like the non-fuel-injected Skyhawks (earlier than the S model). True? Procedures and performance are significantly different, including starting, carb ice ( failure that presumably could be simulated), and performance (160 HP vs 180 in the S).
There’s thousands upon thousands of X-Plane aircraft models, of varying quality because most of them are amateur built.
SimAVIO of course is restricted to stuff they build because it has to work with their panel system rather than the standard X-Plane graphics.
Could have sworn I saw a carb heat knob on one of the Skyhawks, though. Might have been a Skylane.
I think the greatest strength of the Redbird was the use of actual physical knobs and controls and realistically sized instruments. Having to use touch screens to operate knobs makes the new one feel more gamelike. Also, the couple of times I used it, I found that I could not accurately tune radios and do other things that required knob turning without pausing the simulation.
Yes, the touch screen is OK for push buttons but for knobs it frankly sucks. You have to touch on the knob, drag out a bit to make sure you have the the touch, and then drag in a circle around the knob to simulate turning it. This is challenging enough for a single knob like a heading bug on a DG, but gets trickier for a double knob like the tuning control for a radio and is even worse for two-knobs-and-a-button as on the GNS-430. (That one requires explanation and demonstration, and it’s frankly a pain in the ass in general.)
The upside is: it’s a huge cost savings and totally reconfigurable in software.
The two guys who are the founders at FTS are Cirrus drivers, and it shows.
Oh, here’s a brochure with some SimAVIO details:
http://www.flythissim.com/pdf_files/TTBrochure.pdf
Although it’s “cute,” I didn’t really feel that the motion capability of the Redbird added that much to the training. Because of the positioning of the screens, I was only able to use the Redbird for one student in visual situations. Mostly, I got use out of it for instrument training. The down-to-the-floor screens on the FS should make it more useful for teaching primary students.
I think it will be excellent for primary students from a visual point of view. That’s one reason I was happy to put a lot of effort into the local scenery data, so that being in the pattern at N47 would look as much like the real world as possible. (Although the U-Haul trucks, the Fly-Elite sign on the hangar and the Spot-A-Pot over by hangar 18 are probably taking it to a model-railroad level of anal-retentive.)
So… a mixed bag of answers: some "I’m sure I know this" and some "gee, it works at home but I’m not sure about with simAVIO". All can be experimented with.
Appendix: What FTS offers in online training (at $175/hr)
-
IOS Controls
-
Update your TouchTrainer
-
Get the latest software and navigation updates
-
-
Aircraft Sensitivities
-
Modify your plane
-
Custom button and switch assignments
-
-
Creating a backup
-
When something breaks, we got your back
-
-
iPad Integration
-
ForeFlight
-
WingX Pro
-
Xavion
-
Control Pad
-
-
Custom User Scenery
-
Advanced X*Plane Functions
-
Saving situations
-
Using replays and rewind features
-
Advanced Weather
-
Failures
-
-
Remote Desktop Monitoring
-
X**Plane Plugins
-
X**Assign
-
Pilot Edge
-
-
Remote Coaching CFI/CFIIs (through PilotEdge)
-
Saving your flight for review by your instructor
-
-
External Hardware Integration
-
Add speakers, headsets, or intercoms for a more realistic flying experience
-
-
Correct Techniques for Touchscreen Interactions
-
How to correctly twist knobs and press buttons
-
-
Correct Avionics Operation
-
Learn the buttonology of your specific aircraft
-
-
Leveraging the TouchTrainer Strengths, while dealing with its limitations
-
Setting correct MP, Fuel Flow, and % Power
-
Using SIDS, STARS, VNAV, Traffic, Weather, Terrain, and Charts
-
Appendix: X-Plane menus
I’ve tried to make this accurate as of X-Plane 10.45, but errors of course can occur and menu items frequenly move around as the software is updated. Over time, I hope to add cross references into the X-Plane manual.
-
About
-
About X-Plane
-
Instructions
-
-
File
-
Save Situation
-
Load Situtation
-
Save Replay
-
Load Replay
-
Load Xavion flight
-
Load Flight Data Recorder File
-
Take Screenshot
-
Toggle Movie
-
AVI Movie Specs
-
Logbook p63
-
Quit
-
-
Aircraft
-
Open Aircraft
-
Weight and Fuel
-
Equipment Failures
-
Aircraft & Situations
-
A.I. Flies Your Aircraft
-
A.I. Controls Your Views
-
Toggle Puff Smoke
-
Cycle 3-D Flight-Path
-
Reset 3-D Flight-Path
-
Toggle Replay Mode
-
-
Location
-
Select Global Airport
-
Local Map
-
Planet Map
-
Get Me Lost
-
-
Environment
-
Weather
-
Set weather uniformly for the whole world
-
Set random and only semi-controlled weather patterns
-
Paint weather patterns by dragging the mouse
-
Grab real weather from the net
-
-
Date & Time
-
-
Settings
-
Data Input & Output
-
Net Connections
-
Joystick & Equipment
-
Axis
-
Nullzone
-
Buttons: Basic
-
Keys
-
Equipment
-
-
Rendering Options
-
Sound
-
Operations & Warnings
-
-
View
-
Forwards with Panel
-
Forwards with HUD
-
Forwards with Nothing
-
3-D Cockpit Command-Look
-
3-D Cockpit Mouse-Look
-
View is Ridealong6
-
View is Chase
-
View is Circle
-
View is Still Spot
-
View is Linear Spot
-
View is Beacon Tower
-
View is on Runway
-
View is on Weapon
-
View is Free-Camera
-
Translate Left
-
Translate Right
-
Translate Up
-
Translate Down
-
Translate Fore
-
Translate Aft
-
Rotate Left
-
Rotate Right
-
Rotate Up
-
Rotate Down
-
Zoom In
-
Zoom Out
-
Toggle Cinema Verite
-
Toggle Transparent Cockpit
-
Toggle Sunglasses
-
Toggle Night Vision Goggles
-
Toggle Aviation Flashlight
-
-
Special
-
Find Pitch Stability Derivative
-
Find Yaw Stability Derivative
-
Show Flight Model p60
-
Output Flight Model
-
Open Text File for Viewing p67
-
Toggle Text File for Viewing p67
-
Open Checklist for Use p67
-
Toggle Checklist for Use p67
-
Set Environment Properties p106
-
Set Artificial Stab Constants
-
Set Autopilot Constants
-
Set FADEC Constants
-
Show Control Deflections
-
Show Bouncers
-
Show Weapon Guidance
-
Show Projector Setup
-
Show Sky Colors
-
Show Dev Console
-
-
Plugins
